Windows 98 Support of Multiple Monitors
Windows 98 provides support of multiple monitors on a single computer.
Two questions immediately spring to mind:
- How do I do it?
- Why would I do it?
This tip primarily tells you how to do it.
Whether you actually want, or need, multiple monitors is a decision we leave to you.
First, a bit of a description on how multiple monitors work once you get it running.
Windows 98 supports the use of up to nine monitors.
Your collection of monitors is arranged into a virtual desktop.
That is, although there are physically several monitors, they are linked together
to create one logical display system.
One of your monitors will always be your primary display,
and the others will be secondary displays (ok, let's face it, you will probably have at
most one secondary display, but theoretically you can have up to eight of them;
throughout the remainder of this discussion, we will assume that you have one secondary display).
No matter where your two monitors are physically, the secondary monitor is
always immediately to the right of the primary monitor logically.
That is, you can drag a window or icon across the primary display,
off the right-hand side of that display, and it will immediately appear
on the left-hand side of the secondary display.
This would probably be somewhat discombobulating if the secondary display
were not also physically to the right of the primary display.
The secondary display is really just an extension of your desktop, giving you
twice as much room in which to work.
You can now have a program running in a full-screen window on your secondary
display, and have a separate program running in a full-screen window on your
primary display.
When you move your mouse to the right, out of the primary display window and
into the secondary, you operate just as usual.
Click in the secondary display window just as you would in your primary display window.
All in all, this works quite well.
We should note that we have seen some anomalies in early testing.
We had Netscape Navigator 4.7 open in the secondary display, for instance.
We clicked on the Bookmarks tab, and the Bookmark list actually opened in the primary display.
So it appears that the system works well, but not perfectly.
There is no doubt, however, that it is cool and will certainly impress someone.
If you can just find the right someone...
Step by Step
-
You need a separate graphics card for each monitor (it is highly doubtful
that you actually have nine expansion slots available for nine graphics cards,
to support the maximum of nine monitors).
If you are actually still reading this Tip and thinking about doing it,
we will assume that you know how to install a graphics card.
We should point out a couple of things that might surprise you.
From our limited testing, and from some research that we have done,
it appears that if you have an AGP graphics card and a PCI graphics card
for your multiple monitor system, the PCI graphics card will automatically
be selected as your primary display.
This surprises us since AGP is specifically designed for video and would
deliver a much higher video performance than would PCI.
Each PCI slot is assigned a PCI priority number.
The highest-priority PCI slot is usually the one farthest away from the ISA slots.
If you install two PCI graphics cards, the card in the higher-priority slot
(the one farther away from the ISA slots, probably) will automatically be
selected as the primary display.
Finally, you may have a BIOS that will actually let you specify which graphics
card you want as you primary display.
If so, you can ignore the previous two paragraphs.
-
Once you have your graphics cards installed and monitors hooked up, reboot
your computer (we hope you turned your computer off before you started
installing new graphics cards!).
You may have to reboot several times to complete the Plug and Play recognition
of all the new hardware.
-
Your primary display should appear as normal.
At some point, during one of the reboots, you will hopefully see a text-based message that says:
|
If you can read this message, Windows has successfully initialized this display adapter.
|
Congratulations, your hardware is all set!
-
Now you need to complete your software configuration.
Double-click on My Computer, then Control Panel.
Double-click on the Display icon.
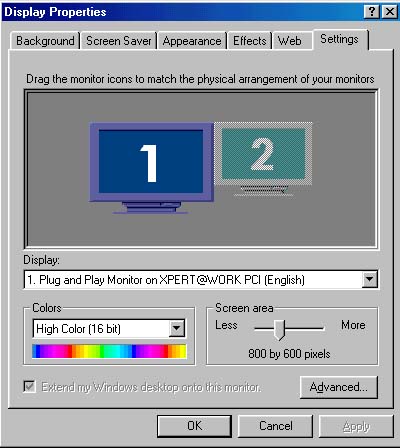
You will see the Display Properties dialog box.
Click on the Settings tab.
You will see a window similar to the one shown to the right.
-
The Display Properties Settings screen now shows two monitors.
Your primary display is Display #1, and your secondary display is Display #2, which is
grayed out since it is not yet available.
Click on Display #2.
You will get a Prompt box similar to the one shown below.
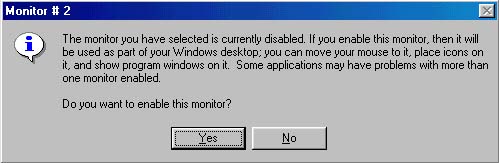
Answer Yes and you are all set!
- You may, of course, have to reboot again, but when you do, your desktop wallpaper
should appear on both of your monitors.
You can open a program on your primary display, then drag it to your secondary display.
-
Finally, we should all congratulate the Macintosh users, who have had this
advanced feature available to them for many years.
Please let us know if this tip has been helpful.
Email to rpearson@cobilan.msstate.edu.
Date posted: 02/28/00